What do Podcasters, Music Producers, and Filmmakers have in common? A justified war against noise and love for audio quality. Audio producers are always looking for better ways to remove background noise from audio.
Any project that needs to capture sound has to deal with noise at some point, and two leading solutions are at hand.
The first choice is pre-production, ensuring that the background noise is not captured in the first place.
The second is to remove background noise from already recorded audio using background noise removal software.
In this article, we will look into some of the best background noise removal programs, along with some tips and best practices to keep in mind. By the end of this piece, you will be equipped with a couple of efficient ways to deal with unwanted noise in post-production treatment.
What Is Background Noise?
Background noise is any irrelevant sound that is audible when listening to the main sound we wanted to observe in the first place. We usually pick it up because of a lack of noise cancellation in our recording space or a lack of good equipment.
In any case, the output doesn’t sound professional, and your listeners won’t be able to enjoy your podcast. The humming of an external hard drive can completely distract your audience from the main piece of content. This is why it’s important to provide our readers with the best solutions available for reducing background noise.
When Do I Need to Remove Background Noise From Audio?
In a time when the world is becoming more and more audibly congested, ruined recordings are a common routine for creatives trying to capture sound. Whether you do podcasts, short movies, or street interviews, you occasionally experience unwanted noise because of human error, electro-mechanical interferences, and unwelcome intrusions from cellphones and air conditioners.
Sometimes the chosen recording time has no space for a perfect take, and deadlines won’t allow you to postpone it. So you do your best and go back to the studio, realizing you need to remove background noise from audio.
The Best Ways to Remove Background Noise From Audio
So, how to remove background noise from audio?
There is a variety of background noise removal software available, spanning from one-click solutions to more complex step-by-step editing software. Obviously, the more details you can manipulate, the better the background noise removal treatment.
A general process of removing background noise from your audio would be:
Acquire Noise Profile: Any software will allow you to take a blueprint of the noise.
Define Background Noise Removal Settings: Simply put, you will need to adjust the levels of noise reduction in dB, the sensitivity with which you want it to reduce the noise, and the frequency smoothing to determine at which level you want to spread the noise reduction on the audio.
Define which part of your audio clip you want totreat: Usually, the software asks you to define the region of your audio to which these background noise removal settings are applied.
Apply the noise reduction.
iZotope RX (Spectral De-Noise)
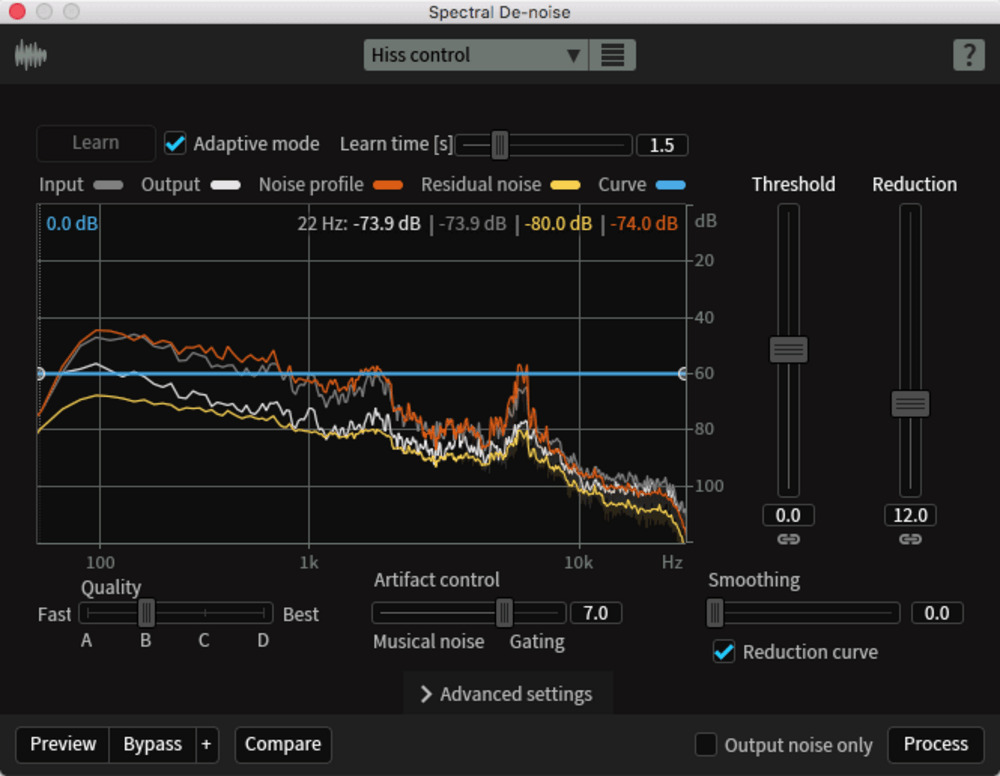
RX Spectral De-Noise is a versatile background noise remover tool that swiftly achieves precise, high-quality noise reduction. It also includes tonal and broadband noise controls, denoising artifact management, and an editing interface for adjusting reduction across the frequency spectrum. A true beast against noise.
Here is how you can remove background noise using Spectral De-noise:
Learn Profile: Try to get a baseline reading of a segment where you can only hear the noise, then click on "Learn". After you do this, the Spectral De-Noise plugin will acquire and save that profile for the current processing. You can click on "adaptive mode" when the noise profile changes depending on incoming audio.
Define Settings:
Learning time defines the amount of perception used by the adaptive mode to detect changing noise profiles throughout your audio.
Threshold controls the level of separation between noise and useful content.
Reduction controls the desired amount of background noise in dB.
Quality affects the computational complexity of noise reduction from fast to best noise treatment.
Artifact Control determines how much noise reduction will depend on either spectral subtraction or wide-band gating.
Smoothing reduces the musical noise artifacts that can result from heavy denoising.
Preview:
Before you start the processing, click on the preview button to get a taste of the expected output. It’s always better to just retweak settings than to ruin your initial audio and have to upload it again.
Apply
After you hit the process, a new track section will be created with the denoised output you just produced. Always make sure to keep the initial audio saved somewhere in case you want to try another level of denoising.
Audacity
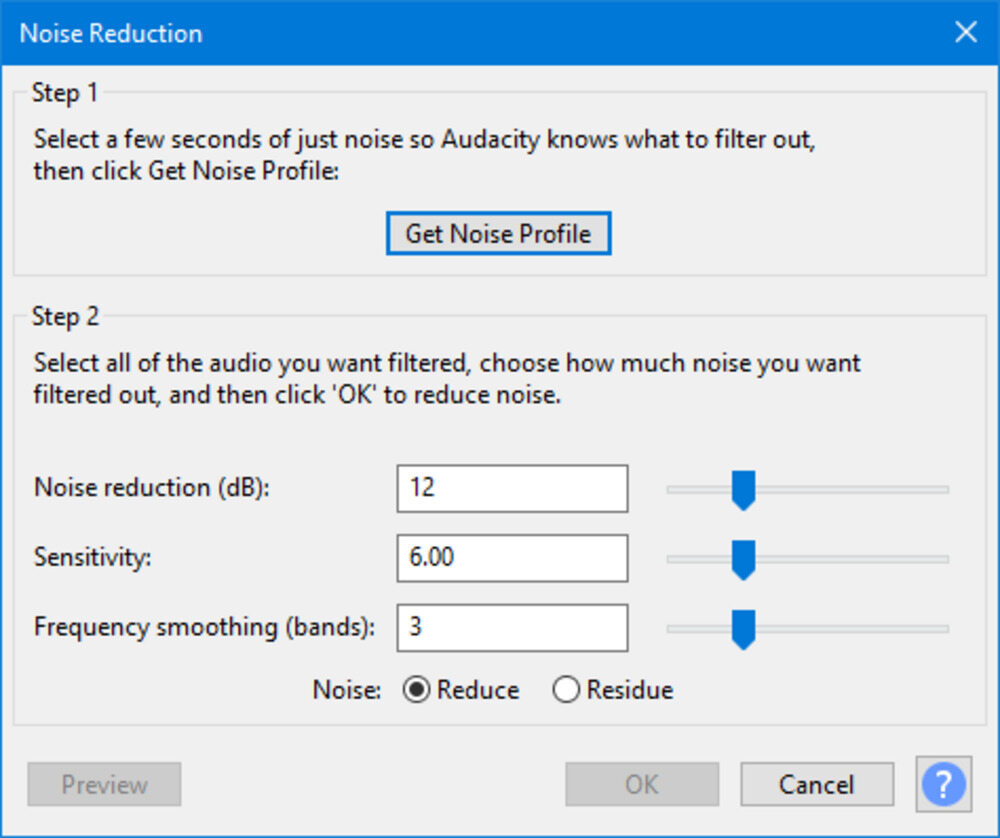
The Audacity package comes with a background noise remover feature. It delivers excellent results when denoising constant background noise. Unfortunately, no adaptive mode is offered, but you still get the software for free.
Here is how to use Audacity's plugin to remove background noise.
Get Noise Profile: After you’ve uploaded your audio, go ahead and select a segment of the audio with only noise in it. Afterwards, head up to “Effects” and click “Noise Reduction”. You will encounter a user-friendly interface where you get to click on “Get Noise Profile”.
Explain Settings: In this step, you need to define the amount you want for each of these settings:
Noise Reduction: (dB) is the amount of noise removal you want to apply.
Sensitivity: for how aggressive you want the noise removal to be.
Frequency smoothing to evenly distribute the noise removal on the audio.
Preview: Now choose a segment that has noise competing with content and click preview. You want to achieve a level of isolating the content from the noise without altering the original quality.
Apply: When you hit that sweet spot of noise removal, select all your audio, click on "OK", and enjoy your denoized piece of audio.
Adobe Audition Noise Removal
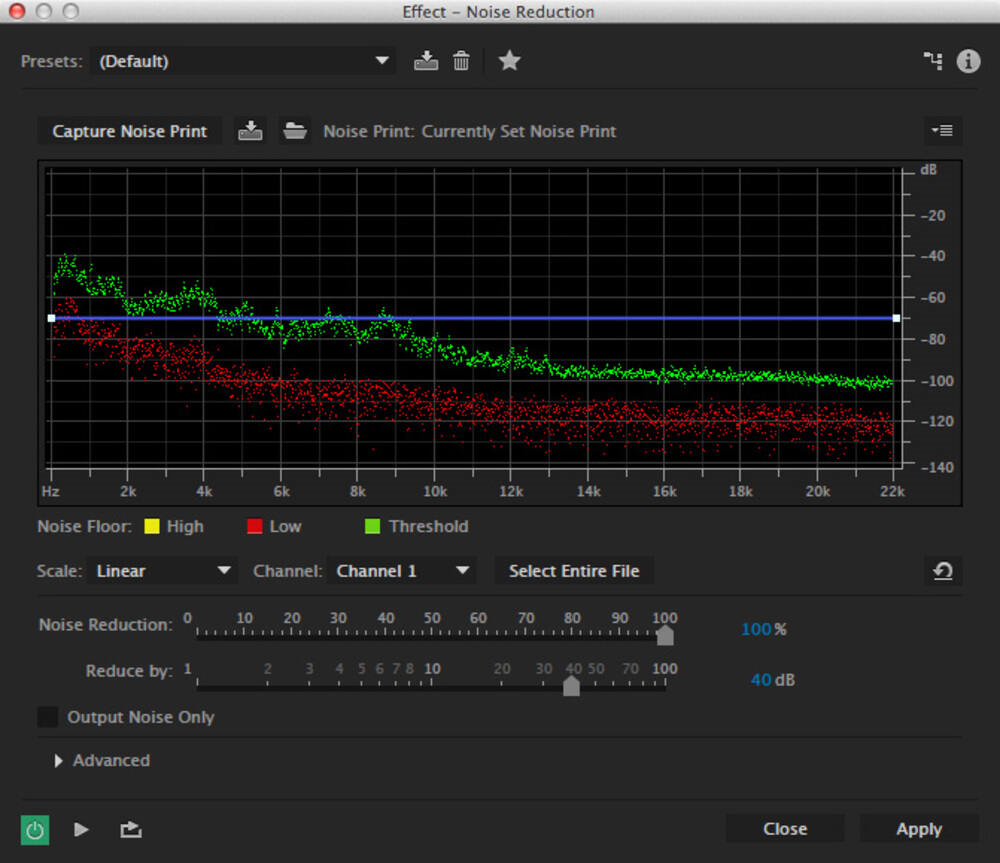
Audition is a powerful Digital Audio Workstation for video editing, podcasting, and audio restoration. Although it is mainly used as a complement to Adobe Premier Pro, it still has a powerful noise remover worth mentioning.
With Adobe Audition, you can remove background noise in two ways:
Capture Audio Profile: Bring up your audio file in Audition and then click on Effects, head to Noise Reduction/Restoration, and choose Noise Reduction (process). Now sample a segment that only has the unwelcome noise on it, and click Capture Noise Print.
Breakdown Settings:
Play around with the following sliders and buttons to get a feel of how it operates:
The visual graph allows you to define the span of frequencies on which you want the processing to operate.
Noise Reduction (dB) sets the strength of noise removal.
Reduced by sets the amount of noise removal applied.
Preview: Click on the preview button in the editor and compare the initial recording with the output.
Apply: Once you’re happy with the reduction settings, click on “Apply” and enjoy your denoized audio.
This feature is easier to use and, obviously, not as effective. It only requires you to choose the type of processing you want from the “Processing Focus” horizontal list and set an amount of noise removal from 0 to 100%.
The result is not as powerful as the Noise Reduction effect, but it can be useful if you don’t have an annoying amount of noise in your audio.
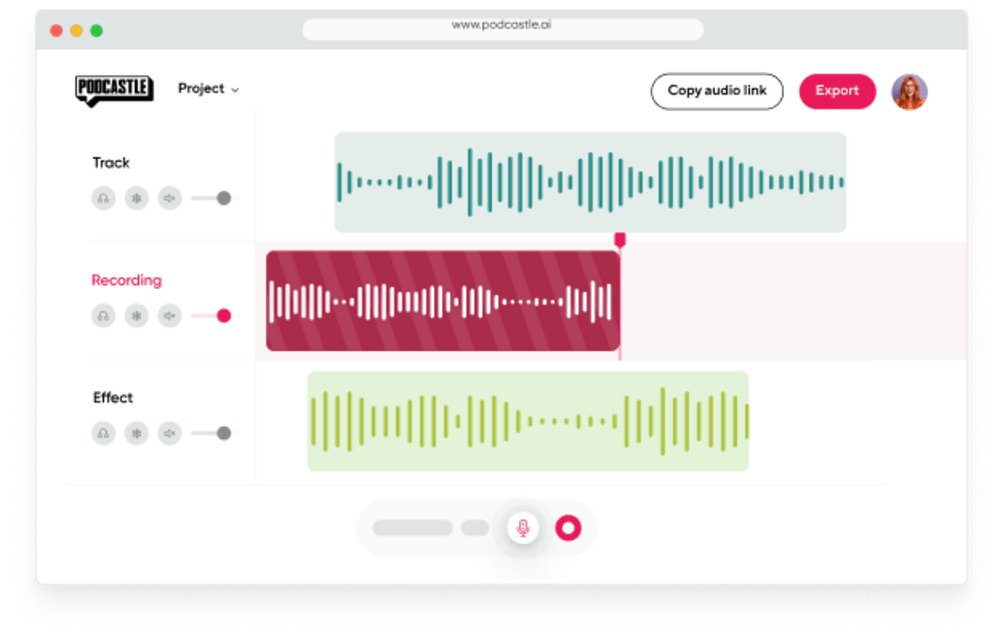
Podcastle (Remove Background Noise With AI)
Sometimes the noise removal details don’t matter to you, and all you need is an overall general reduction of all that could distract your listeners from the main content. Some solutions have recently become available with the introduction of machine learning to the industry.
Websites like Podcastle offer you a web app in which you can upload your noisy audio file, and clean it with only a couple of clicks. You need to select the audio you wish to enhance and then go for “Magic Dust”, resulting in clean audio.
You can imagine that this type of solution offers no in-depth manipulation, and thus, you can not control it. I find this tool valuable when dealing with complicated background noise profiles, such as background music. In some instances, it can restore the audio to a usable quality.
Enhance Speech by Adobe for Podcasters (AI)
Enhance Speech is a relatively new tool similar to the one mentioned previously. The principle is the same: drop a file and let the AI remove background noise for you. One feature I find helpful in this app is the mix slider, which allows you to mix the original sound with the heavily processed one.
I should also mention that in 2024, Adobe released the Enhance Speech V.2, which has a slightly better AI engine and should provide better results.
These tools are undoubtedly impressive, but I find myself relying on them primarily in challenging or extreme situations. For instance, if I provide the AI with a high-quality audio recording that has a small amount of background noise, the processed output often comes back noise-free but with a robotic and potentially harsh sound quality.
Re-record Your Audio If Noise Reduction Is Not Possible
All of these post-recording tools and tricks came as an answer to the unsettling, obnoxious feeling of having to redo a perfect take. Yet, no amount of technological prowess and magic tricks can reproduce the preventive way of recording in excellent settings.
If no technological solution or audio engineer prevails in synthesizing an excellent environment for your audio, then the time has come to try again.
Here are some important practices for clean audio recording:
Use a cardioid dynamic microphone: Extremely sensitive to sound coming in from the front of the mic and has a low input dB that virtually rejects all surrounding noise.
Quiet down your space: The room you record your podcast in might have a lot of reverb, echo, and other natural effects of space. Reduce them by strategically placing heavy rugs, curtains, and wooden furniture. You can always soundproof your room which will be pricey, but many bedroom producers achieve studio-level quality simply by correctly rearranging their room.
Get away from ambient sounds: Even when you quiet down your room, some ambient noises like your laptop’s fan, hard drives, or your pet’s breathing might interfere. Simply get your microphone as far away as possible and record.
Add Acoustic Treatment: If you always record in the same room, you might want to consider investing in acoustic treatment. There are many acoustic treatment plans for different budgets and needs.
Use minimal gain: When you turn up the gain on a microphone, the additional loudness in the input signal will affect everything the mic catches, even the noise. You want to have the gain somewhere at an average level without the risk of audio clipping.
Reduce Mouth and Mic Distance: Stay close to the mic so it can record everything clearly. A rule of thumb in the industry says six inches, but feel free to experiment with the tone and reach of your voice.
What is white noise?
White noise sounds like a "hiss" in the background. You will hear white noise when the radio is not tuned to a radio station frequency.
The truth is, white noise is one of the easiest unwanted sounds to remove because it is very predictable. All the options explored above would be able to remove white noise.
How do we deal with wind noise?
The best way is to prevent it by using a windshield. If, however, your recording includes wind noise, you can reduce it by using the "De-Wind" feature in iZotope RX.
Can you remove echo?
Yes, there are specific tools for this job. In audio production, we call this process de-reverb. One of the best tools for removing echo is iZotope RX – De-Reverb. Another reliable plugin is Clarity VX DeReverb PRO
How To Remove Background Noise – It's a Wrap!
So there you have it. Now that you know how to remove background noise, nothing stands between you and clean audio.
Bogdan Bratis
CEO & Founder of Saspod. Podcast Producer & Digital Marketing Expert. I'm based in Glasgow, where on the side I play keyboard in function bands throughout Scotland, and I'm addicted to coffee.


Comments
No comments yet!