Recording a podcast today is easier than ever. Whether you’re on a budget, working from a professional studio, or recording remotely, there are countless ways to get started. After reading this complete guide on how to record a podcast, you’ll have everything you need to record your very first podcast today.
With a multitude of options, many get stuck on choosing the right equipment or software, and they delay starting. It is what I call “the analysis paralysis syndrome”.
Since there are multiple ways of recording a podcast, you’ll need to choose the right approach based on the style of podcast you’ll be running.
In this article, you’ll learn how to record a podcast in the following ways:
How to record a podcast remotely
How to record a podcast in the studio or office
How to record a solo podcast
How to record a podcast on iPhone
And a lot more context, so you can learn the best way to record a podcast.
Podcast Recording Equipment
Technically, we all have an audio recording device at our fingertips, and you could use it to record a podcast - but should you?
Many guides out there will advise you to record a podcast, no matter the method and equipment used. I think this is wrong because it creates the impression that podcasting is a low-quality medium where production standards don’t matter.
Podcasting has become more competitive, and quality matters more than ever. And quality starts with knowing how to record a podcast.
The good thing is you don’t need costly equipment to record a podcast, but what matters most is how you use it.
Podcast Microphone
To record a podcast, you will most definitely need a podcast microphone. As long as you stick to a reputable brand and you use the microphone correctly, you should be able to get a decent sound.
Dynamic VS Condenser Microphone
Dynamic - We also discussed dynamic microphones in a dedicated article. This type of microphone is usually used in live environments. They are very durable and highly capable of blocking noise, making them optimal for podcast recording. The only downside is that the speaker needs to stay relatively close to the microphone while recording. Otherwise, the sound might not be captured properly
Condenser - We discuss condenser microphones in a different article. In essence, they are best suited to record a podcast in controlled environments. They are very sensitive and offer better sound clarity. They do not require extensive mic techniques and can pick up sound from relatively far away without significantly affecting their sound quality. This type of microphone usually requires phantom power, which is an external power source. However, you do not need to worry about this because most audio interfaces or mixers have this feature. You can find either a USB or XLR version of the condenser microphone.
USB Microphones
A USB microphone is one of the best ways to record a podcast solo. It is very easy to use and requires less gear and fewer steps in the setup process. For this reason, it is also more portable: You can plug it into your computer and start recording a podcast in seconds.
When NOT to record a podcast with a USB microphone?
The real disadvantage of a USB microphone is that it is only great for a one-person set-up. This might be problematic if you wish to expand your podcast. Recording a podcast with two or more USB mics is possible; however, it is far from optimal and can quickly become frustrating.
Both condenser and dynamic microphones can be USB microphones.
XLR Microphones
The XLR is a professional connector usually found on professional audio equipment. It relies on three or seven pins to transport electricity, making this type of connection more reliable. Because you can’t plug your XLR cable straight into your computer, connecting the two requires additional gear - an audio interface.
Most podcasters prefer this type of setup because it streamlines the workflow and gives them better, faster control over the recording.
When NOT to record a podcast with an XLR Microphone?
In most cases, an XLR microphone is the better option because it is more versatile and has a better connector. However, if portability is your prime deciding factor or you simply do not wish to invest in an audio interface, a USB microphone might be your best option.
Both condenser and dynamic microphones can be XLR microphones.
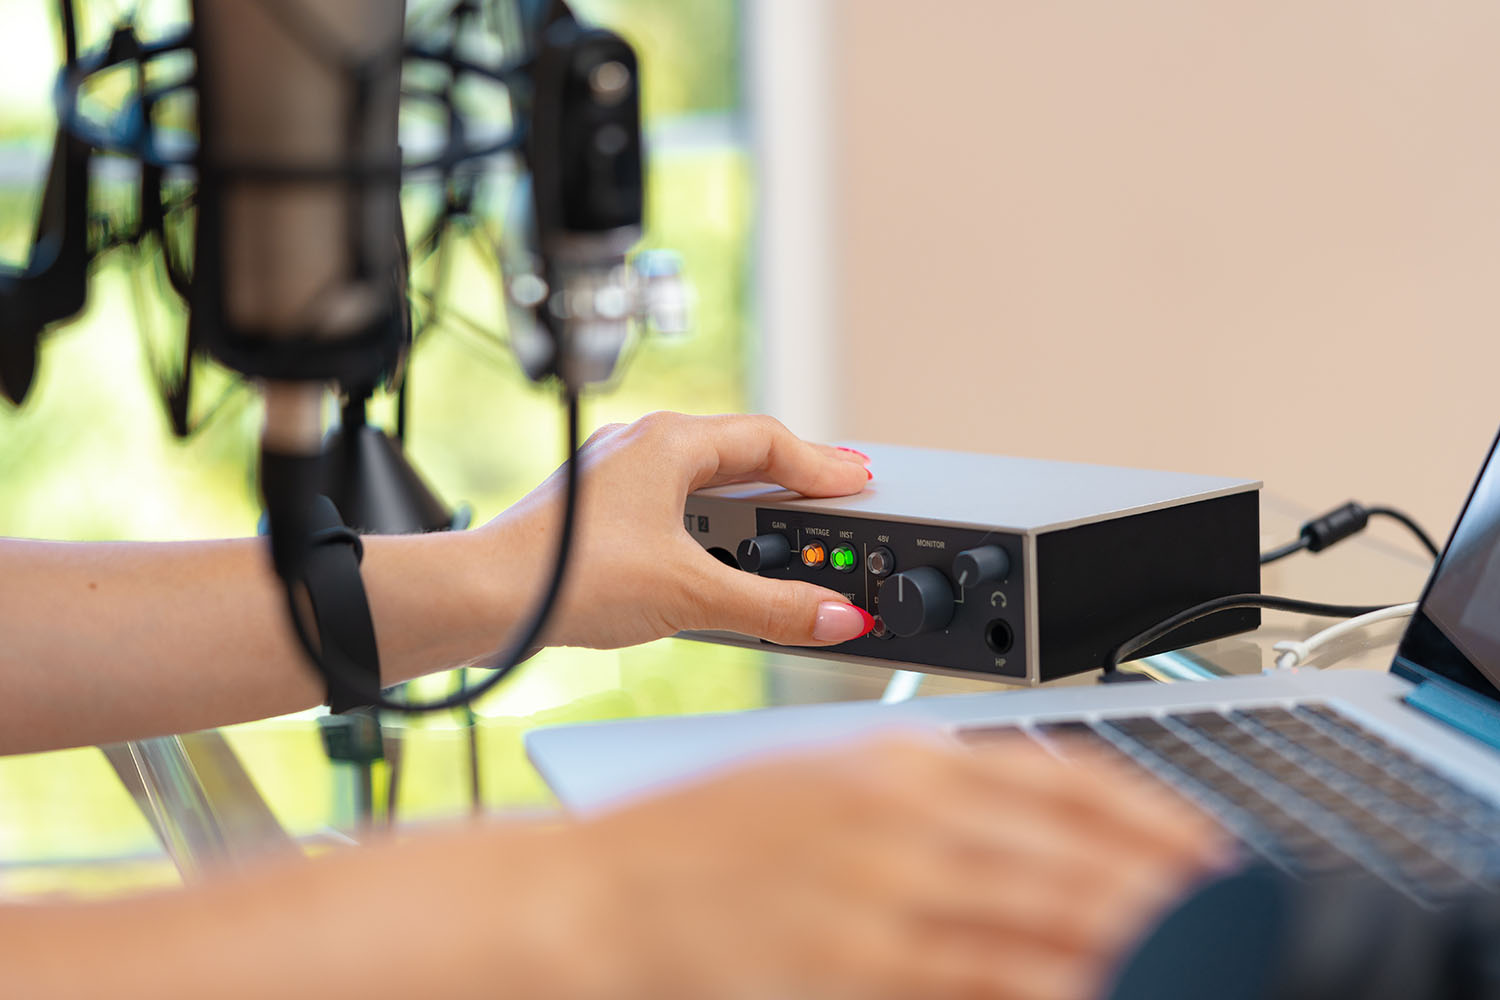
Audio Interface
Simply put, the audio interface converts the microphone's analogue signal into a digital signal that the computer can read. In other words, it is a bridge between the microphone and the computer. A basic audio interface has one or multiple XLR connections, outputs for studio monitors and headphones, input and output gain controls, and a phantom power switch. It connects to the computer via a USB cable, which is usually included with the audio interface.
Although the audio interface may initially seem intimidating, its higher-quality converters will produce better-sounding recordings. Furthermore, having an external hub for the audio gives the podcaster more control, which will lead to fewer unexpected malfunctions and a better experience in the long run.
Video Camera
How to record a video podcast, you ask? You’ll need a quality camera to ensure your image looks clear and professional. While webcams may seem like a convenient option, they’re typically designed for video conferencing rather than podcast recording, and often fall short in terms of image quality.
You have two realistic options:
Photography Cameras DSLRs (Used as Video Cameras)
You can buy a photography camera and use it as a video camera. The most popular choice for this type of setup is the Canon M50 or R50. This is a high step from a webcam, but it comes at a cost. You can expect to pay between $500 and $700 for this kind of camera, but it's a good long-term investment.
Most photography cameras come with the lens included, and most of the time, it is what you need to record a video podcast. Unfortunately, this type of camera comes with a few drawbacks. The most frustrating ones include frequent battery recharges, a 30-minute video recording limit, and limited video settings. There are ways to go around them, however.
If you decide to go this route, you'll need to buy a capture card and a dummy battery. These two accessories will help you overcome these issues.
I won't include a link because each camera requires a different version. If you have any questions, please don’t hesitate to contact us.
Cinema Cameras
Welcome to the world of cinema cameras, the next level beyond regular DSLRs. For a podcast setup, this is likely the best investment you can make. Unlike photography cameras, these are specifically designed to record video content. The most popular models are Black Magic Pocket Cinema Cameras, Sony FX30 Digital Cinema Camera, or Canon EOS c100.
Cinema cameras are expensive, and they can range from $2000 to $10000. If you decide to buy a Cinema Camera, it is essential to get the features you need to avoid purchasing an overkill.
Cinema Cameras are very convenient for podcast recording, they can shoot for very long periods, and can be connected to a power source. On top of that, the image quality you get with this kind of camera will make any podcaster jealous. It is important to note that Cinema Cameras don't always include a lens, so you'll need to do your own research to find one that fits your camera.
Lights
Lighting is essential for recording high-quality podcasts, but what matters most is how you use it. There are budget-friendly options like Neewer, as well as premium brands like Aputure. The type of light you choose may require a diffuser, which softens harsh light and creates a more natural, even spread throughout the room. Depending on your budget and the size of your room, you may opt for a 1-point, 2-point, or 3-point lighting system.
I personally like the Aputure light series.
Record A Podcast Using an ATEM
An ATEM is equipment designed to record videos specifically. It works by recording the HDMI outputs of multiple cameras directly into an SSD. The most famous ATEM used in podcast recording is the ATEM Mini Pro ISO by Blackmagic Design. This little device solves a lot of issues, and it will improve your workflow tenfold.
Not all ATEMs are created the same, and some may be different, so it is important to check the manual for all the features.
The advantages of using an ATEM:
Record multiple cameras simultaneously on a single storage device.
Use a large SSD, reducing the need for frequent reformatting.
Edit your video podcast in real-time as you record.
Stream multiple camera feeds at once.
Capture audio and video together, ensuring perfect sync from the start.
Is there a downside? Well, there’s one minor limitation: ATEMs only record in 1080p. But honestly, recording a podcast in 4K feels like overkill.
Accessories To Record A Podcast Correctly
Boom arm
The practicality of a boom arm can’t be questioned because it contributes to the sound quality. The boom arm will help you position the microphone easily, allowing you and your guest to keep it close to the mouth at all times. Furthermore, it will protect the microphone from rumble or shock noise that might be picked up otherwise.
Pop filter
Although it may not seem so at first, the pop filter makes a big contribution to the consistency and quality of the sound. It protects your recording from plosives and excessive breath sounds. Also, the pop filter helps you keep an adequate distance from your microphone.
Headphones
Headphones are used in podcasts to monitor the sound and ensure a smooth recording. Monitoring will help you and your guests maintain a consistent sound throughout the show because you’ll always hear what the microphone is capturing. This way, you will know if you are too loud or soft or if the recording equipment is malfunctioning.
Cables
High-quality cables are always best. Although they might cost more, they will last longer and be cheaper per usage. Apart from being more reliable, a good cable will,in fact, give you better sound. A long cable will offer you more versatility, and for only a tiny price difference, you won’t need to worry about cable management. The last aspect to remember is to have at least a spare cable in case you need to replace one in your setup.
Teleprompter
One piece of equipment I found helpful, especially when recording a podcast solo, is a teleprompter. This piece of equipment is very useful when reading scripts.
Software Needed To Record A Podcast
Audacity
Audacity is by far the most used audio recording software. The reasons are simple: it’s free and easy to use. You can record multiple channels and have all the basic controls you might need. Furthermore, with their last update, which improved their file management, Audacity is now even more user-friendly. For these reasons, Audacity is our top recommendation for podcasters. If you wish to learn how to record a podcast using Audacity, watch this short tutorial.
GarageBand (Mac only)
GarageBand is a free recording software that is pre-installed on Mac computers. The advantage of using GarageBand to record a podcast is that it has a more intuitive interface, and it comes preinstalled on your computer. The only reason it isn’t more popular is that it doesn’t work on Windows or Linux.
OBS
This is a great software for recording a podcast both audio & video. Using a capture card, you can feed video directly into OBS, enabling many customisations that will improve your workflow. OBS can also stream on multiple platforms, which is excellent for you streamers out there.
Riverside Fm
Riverside FM is one of the most popular in-cloud podcast recording platforms. It can be used to record podcasts remotely, but many also use it to record solo podcasts. It is as simple as starting an account and hitting record. Although easy to use, it has its limitations.
Podcast Recording Pre-Production
When recording a podcast, preparation can save you from a lot of trouble down the road. There’s nothing worse than recording a podcast the wrong way and then telling your guest that you’ll need to re-record it.
We all had these horror stories, so here is how you avoid that.
Plan A Real Story
If you want to run a successful podcast, you’ll need to treat it like a TV show, so that means pre-production. There are very few podcasts that succeed through random chats; most of the time, these shows have a celebrity host or a PR push that makes them work. But for most of us, this may not be possible, so creating the best content possible is key.
Start with the content, then find a guest who naturally fits the narrative. Look at what’s currently trending and identify the topics your audience actually wants to hear about. A simple Google search, a browse on YouTube, or the use of tools like Ahrefs or Semrush can provide valuable insight into audience demand.
Scripting / Outlining
Before recording a podcast, it is always a good idea to prepare a podcast script or outline to give your episode a clear structure.
Scripts are rigid and are usually used in a solo recording setup. You will simply read the script while you record, directly from the screen or using a teleprompter.
Outlines offer a flexible podcast episode structure, covering the main discussion points and a handful of guiding questions. It allows room for natural conversation and minor deviations during the recording.
Equipment Settings
Each podcast setup will be slightly different, so I won't give you a standard recipe. In essence, you need to ensure that all your audio & video equipment is connected to your computer. Test each microphone and camera, and ensure your computer records the information. You may need to perform a few tests before pressing the recording button.
Avoid Clipping
The first issue you'll encounter when learning how to record a podcast is audio clipping. This issue can be easily managed by lowering the gain input. This knob is usually found on your microphone or audio interface.
Control Camera ISO & F-Stop Settings
Each video camera will have an ISO setting, which you can control. Always aim for an ISO no higher than 500. If you need more ISO, it means your F-Stop is too high, or you need better lighting in the room.
What is a digital recorder, and do I need one?
A digital recorder or a podcast recorder is a device that lets you record audio directly to an SD card or another storage device without a computer. This can be useful if you want to record a podcast on the go, or you just want a compact system without the need for additional computer software.
They come in different shapes and sizes, so you’ll need to choose the one that fits your needs. Here are some popular options I would recommend:
Following the COVID-19 pandemic, many podcasts shifted to remote recording setups, making remote production the default for much of the industry. Today, many creators prefer recording podcasts remotely, as it allows them to invite guests from anywhere in the world without being tied to a specific location.
Record A Podcast Using Zoom
If you are on a budget, you can use Zoom's free version for remote podcast recording. This would not be an ideal solution because Zoom compresses files heavily, significantly reducing quality.
If you choose Zoom for remote podcast recording, you might find this article helpful.
A wide range of software now supports “double‑ender recording.” We’ve already mentioned Riverside.fm, but other popular options include Squadcast and Zencastr.
With this method, each participant records their podcast locally on their own computer, while a lower-quality stream is sent to the other party in real time. The result is high-quality individual recordings from both sides, even when participants are remote.
What is Echo Cancellation?
This setting is relevant for Double Ender Recording solutions. When activated, it allows you to record a podcast without headphones.
Please always use headphones when recording a podcast remotely!
There are significant downsides to using this feature. Every time parties speak over each other, which happens often, a muffled sound is introduced due to the echo cancellation’s filtering.
You don’t need this feature when recording a podcast with headphones, so we recommend deactivating it. If you must use it, always try to avoid speaking over each other.
2: How To Record A Podcast In The Studio or Office
Recording a podcast in a studio is the best way to record a podcast, but it’s also the most complex to pull off.
When you record a podcast in the studio, you’ll be in the same room with your guest. This can sometimes create certain complexities when recording audio or video.
You’ll need two microphones connected to an audio interface
Microphones need to be positioned far apart to avoid bleed.
You’ll need 2 to 3 cameras to record video
Everything should be recorded locally
You should get some help from someone who knows how to run podcast equipment. When the guest is in the studio, you don’t want to operate the equipment yourself; under pressure, you’ll likely forget something, and you don’t want your guest to wait an eternity for your equipment to be ready to record.
3: How To Record A Solo Podcast
Recording a podcast solo is usually pressure-free. When doing this, I would always stick to open-source software such as Audacity or OBS. This will ensure the highest quality and prevent additional subscription costs.
When you record a podcast solo, there is time for retakes, so don’t panic if you mess up a line; you can retake it and fix it in post-production.
4: How To Record A Podcast On iPhone
If you want to record a podcast on iPhone, this is absolutely possible; however, you’ll need to experiment with different recording methods.
Record with the built-in microphone.
Find a memo recording app; every phone has one installed.
Place your phone on a table with its microphone pointing towards you
Press record and start talking
Use a lavalier microphone.
Another way to record a podcast on your phone is to use a lavalier microphone compatible with your phone. Here are two options.
BOYA BY-V1 - Compatible with the iPhone Lightning port
Connect a USB microphone directly to your phone or tablet.
In the past, I’ve also connected USB microphones directly to tablets and phones and recorded a podcast in the GarageBand app. Surprisingly, it works, but you’ll need to test it yourself.
USB microphones aren’t built for this purpose.
How To Avoid Background Noise When Recording A Podcast
Background noise can ruin your podcast recording if not appropriately controlled. Luckily, there are tools and techniques you can use to remove it if prevention fails. If DIY doesn't work, consider using a podcast editing service; they can often do wonders.
They can be split into main categories.
Electromagnetic Interference Noise
This usually sounds like a continuous buzzing sound. It is generally caused by incorrect equipment setup, a lack of electrical grounding in the system, or radio equipment operating in proximity to audio equipment.
If you encounter this issue, first move your equipment to a different room and check whether the noise persists. If the noise disappears, it’s likely that something in your original studio space is causing interference.
To identify the source, reconnect your equipment and disconnect each device in your studio at a time while monitoring the noise level. If the noise stops after disconnecting a specific device, that device is likely causing the interference.
Proper cable management can also help prevent this issue. Make sure cables are neatly organized and avoid running audio cables alongside or overlapping with electrical wires.
Extrenous Sounds
This type of background noise is the hardest to control. You really can not have control over noise generated by cars, planes, dogs barking, or kids screaming in the background.
The only solution to this would be soundproofing, which we touch on in this article:
FAQ
How do I make the podcast public after I record it?
For this, you will need to use a podcast hosting service. A platform like this will make it easy for you to publish across multiple platforms simultaneously. We will, of course, recommend that you use Saspod for this.
How can I edit my podcast after I record it?
To edit a podcast yourself, you’ll need to use a DAW. If you are not bothered and want professionals to take care of this, you can use a podcast editing service.
How can I add music to my podcast?
OBS or Roadcaster has specific features that let you play music and add special effects while recording, but the best practice is to add them in post-production. You can source royalty-free music from companies such as Envato, Artlist, or Elevenlabs.
Can you record a podcast using your laptop’s built-in microphone?
The short answer is yes, but would it be worth it if a microphone is less than $100 and recording with it would be 100x better?
Bogdan Bratis
CEO & Founder of Saspod. Podcast Producer & Digital Marketing Expert. I'm based in Glasgow, where on the side I play keyboard in function bands throughout Scotland, and I'm addicted to coffee.

Comments
No comments yet!