ABOUT ZOOM
We usually don’t recommend Zoom for podcast recording. However, we know that it is the only tool that may make sense in a few corporate environments. People in a corporate environment don’t have the time to fiddle with the sound. I don’t recommend Zoom for podcast recording because it records in a cloud using the internet bandwidth and not on the local machine (your computer). Unfortunately, this single reason can affect the recorded sound quite a bit. While the internet bandwidth may be limited, the audio stream can be interrupted, damaging the recording. This may not be a real problem if your internet connection is good, however, you can never control your guest’s internet connection. To compensate for this problem, zoom automatically compresses the sound during recording into a format called “m4a”, which significantly reduces quality.
1: SET UP YOUR HARDWARE CORRECTLY.
On BOTH sides, YOU and your GUEST will need to be aware of the following aspects. Send an additional e-mail to your guests with a few steps they need to follow before the interview. They can address some of these issues beforehand.
- Do the interview on a laptop or desktop rather than a phone if possible.
- Connect your Laptop/Desktop to a modem using a CAT5 cable, if your laptop doesn’t have a network port use a USB A or USB C to Network Port convertor.
- Check your internet speed on speedtest.net by Ookla. Try to achieve numbers around at least 30Mbps download 30Mps upload at least, the more the better.
- Make sure no one in your house/office is using the same internet connection to stream video or download large files.
- Unplug any useless peripherals that may interfere with your computer, such as USB Lamps, USB Sticks, USB Fans, etc…
- Connect your recording peripherals, microphone, soundcard, headphones etc…
- Place your laptop on a hard flat surface such as a table so the laptop can maintain an optimal temperature.
- Make sure the room temperature in your room is not too high (You don’t want your computer to overheat and then the fans to start spinning generating additional noise).
2: UPDATE YOUR SOFTWARE AND OPTIMIZE YOUR COMPUTER.
It is important that your software is up to date.
- Update Zoom to the latest version.
- Clean your computer and make sure your storage is empty by at least 20%.
- Close unused software such as e-mail, browser tabs, games etc…
- To find out if a background software is using your bandwidth, use “Task Manager” on Windows or “Activity Monitor” on Mac.
3: CONFIGURE ZOOM FOR PODCAST RECORDING

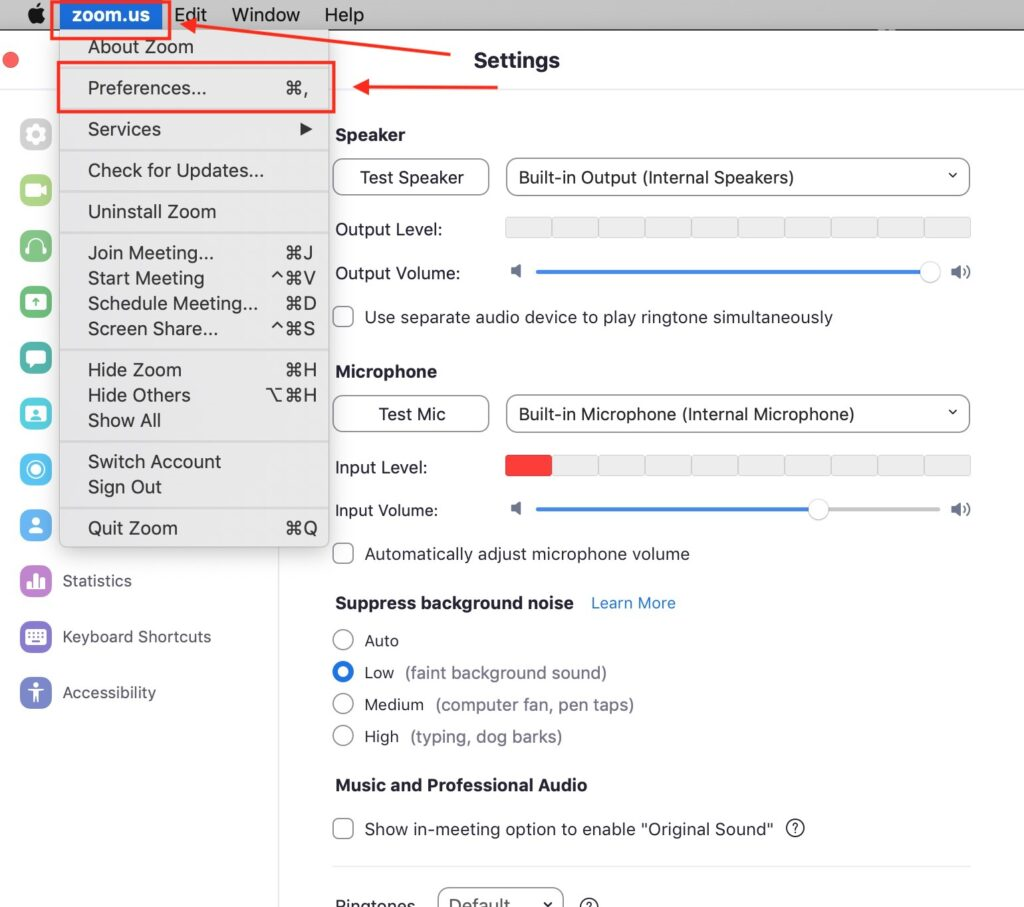
On Mac: Open Zoom and go to preferences or press the following key command: CMD + ,
On Win: Open Zoom and go to preferences or press the following key command: CTR+ ,
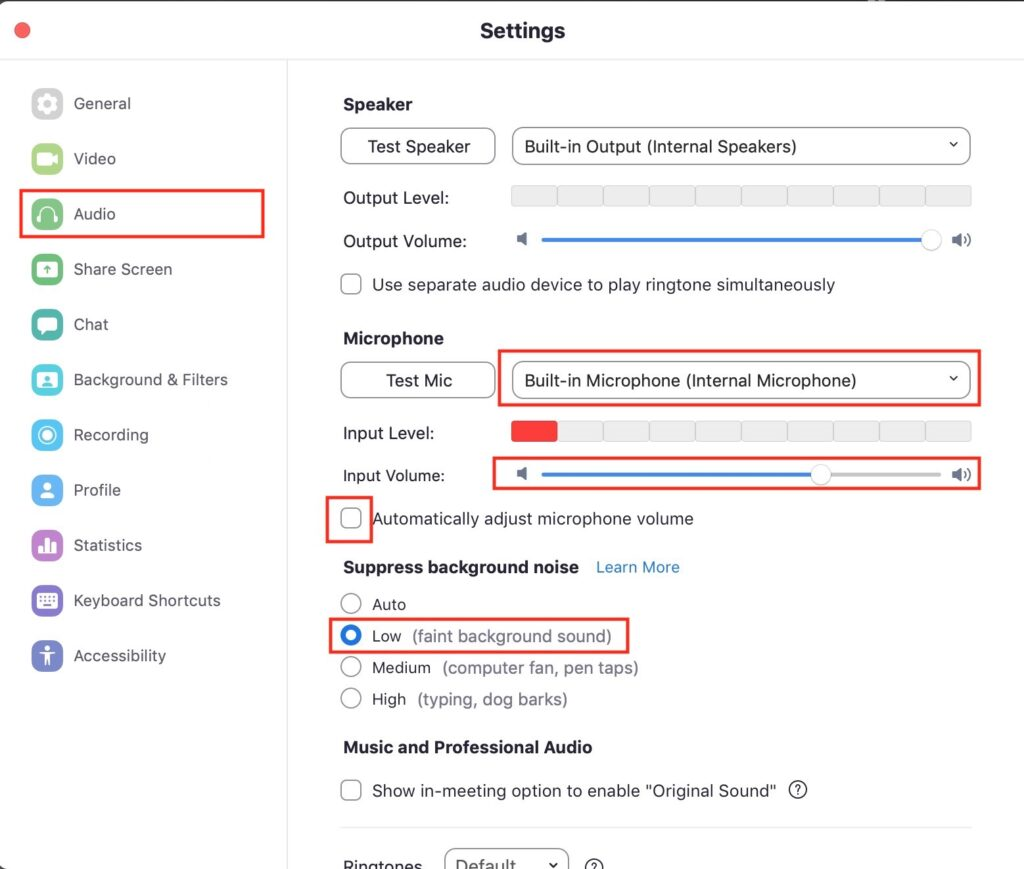
Configure the Audio Page:
- Select “Suppress Background Noise” to Low. (The algorithm Zoom is using for this function is not good enough, and this can be solved in post-production if needed.)
- Uncheck “Automatically adjust microphone volume”. (This function can clip the audio and cause distortion; the audio is best adjusted in post-production).
- Choose the microphone you will use for recording, for example; if you use a USB Mic make sure the mic is plugged in and choose that Mic. Same rule for a soundcard!
- Adjust the “Input Volume” while speaking in the microphone naturally. Make sure the audio stays in green most of the time, and it never reaches the 3rd, 2nd, or 1st box on the right.

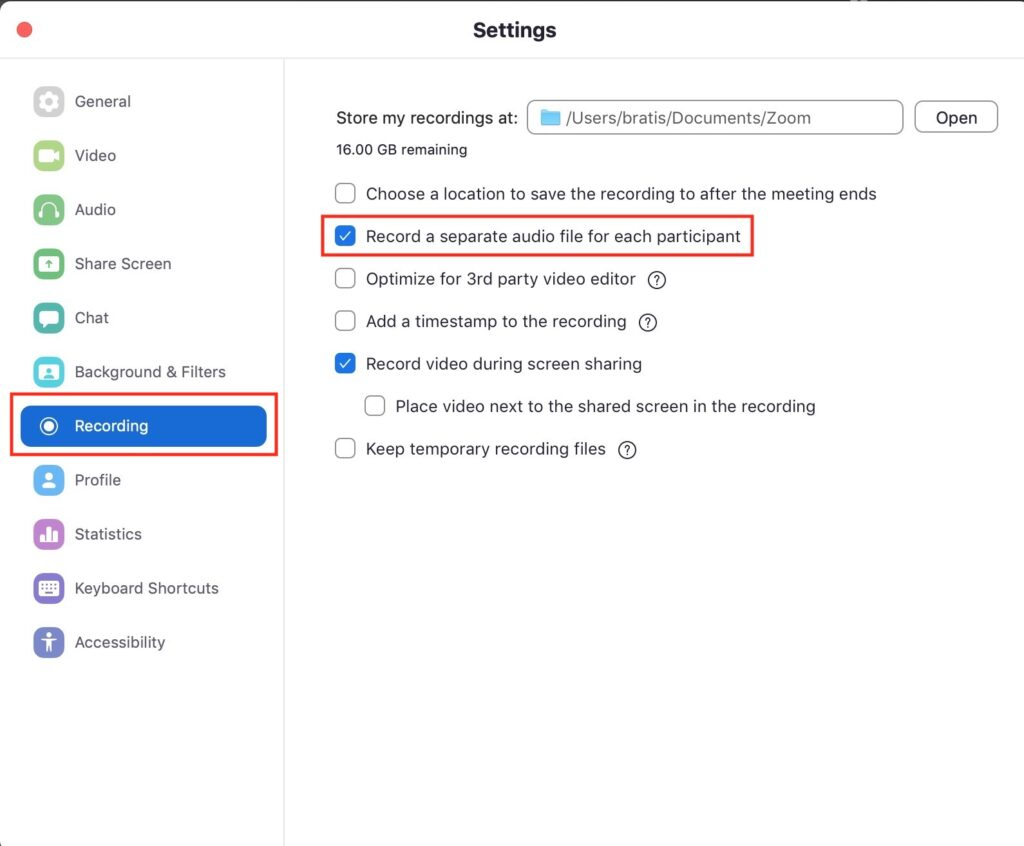
Configure the Recording Page:
- Check “Record a separate audio file for each participant”

OTHER TIPS:
Record your audio on an additional device, such as a memo app on your phone or a separate software running on your computer. Audacity or Garage Band would be good options here. This is a smart way to ensure that the audio, at least on your side, sounds the best. A sound engineer can easily sync up the guest’s Zoom-recorded audio with your local recorded audio. Podcast listeners tend to forgive bad-quality audio on the guest’s side; however, they usually expect the host to sound clear and professional.
CONCLUSION:
If you follow these steps, you will get the best audio from your Zoom session. However, we still recommend using platforms such as Zencastr, Squadcast, Riverside, etc.… for podcast recording. If you have any more questions, please don’t hesitate to contact us. We would be more than happy to help you.
Bogdan Bratis
CEO & Founder of Saspod. Podcast Producer & Digital Marketing Expert. I'm based in Glasgow, where on the side I play keyboard in function bands throughout Scotland, and I'm addicted to coffee.


Comments
No comments yet!