Our team noticed that some of our customers struggle with recording podcasts using tools such as Zencastr. At first, Zencastr may seem intimidating, not to mention the many other factors involved. We understand that things can get overwhelming quite fast.
So, follow this guide before starting a new podcast interview with your guest. It explains the settings you need to consider when recording with Zencastr, and how to use Zencastr overall.
Why Use Zencastr?
Before we proceed with the guide, let's explore why Zencastr makes a good addition to your podcasting toolset. Experienced podcasters use Zencastr to record remote interviews. Not being in the same room with your guest can create certain challenges when trying to record a good-quality podcast. Zencastr solves these problems while still maintaining audio and video quality.
Zencastr works by recording your audio and video on your local storage device. This method allows podcasters to record high-quality audio and video, providing their audience with a great podcasting experience.
One of the obstacles podcasters face when recording podcasts using tools such as Google Meet or Zoom is the high compression these tools add to your recording so that it can be streamed over the internet. Not only that, but most standard video conference tools don't allow for multi-track recording.
The ability to record multi-track will give you a massive advantage once you decide to produce the show, giving you the ability to remove noise and filler words more transparently. Zencastr will also give you the option to download isolated video files, allowing for multi-cam editing.
Why Is Audio Quality Important in Podcasting?
Podcasting has become a very competitive space. If 5 years ago, you would have probably gotten away with average-sounding audio recordings, in 2025, sound quality has become a must, especially with the rise of audio and video tools such as Zencastr. Personally, if I were to watch a video podcast while the audio sounds terrible, I would tune out from the podcast and choose a different podcast in the same niche instead. And believe me, your audience thinks exactly the same way when it comes to sound quality.
What Plan Should I Choose?
Zencastr used to be free; however, those days are now unfortunately gone. Personally, I believe that the standard version is more than enough for most podcasters; however, if you need more functionality, the Grow, Scale and Business pro plans would provide other features such as AI editing, instant publishing on Social Media platforms and YouTube, dynamic ads and more.
When it comes to the quality of your podcast, the standard version would be more than enough. The standard version includes only 1080p video recordings and 16-bit at 48 kHz sample rate audio; and this is more than enough while podcasting.
Step-By-Step Zencastr Recording Guide
Follow this guide and be ahead of the game before the next podcast recording. It is important that you follow these steps carefully before each recording session; by doing this you will ensure the best quality podcast and experience for your guest.
Step 1: Start This Process 30 Minutes Before The Actual Interview
If this is your first time doing this, 60 minutes might not be a stretch. Open the Zencastr room early, ahead of the interview recording. Verify if any element of your setup stops functioning. This gives you enough time to solve the issues or, in more extreme cases, cancel the interview and reschedule it. Spend some time testing your hardware and software (we will talk about this later).
If you have a co-host, make sure he/she joins the session at the same time and begins testing their recording equipment as well.
Step 2: Clean Up Your Setup As You Would Clean Up Your House Before The Guest Turns Up!
-
Close all irrelevant applications, especially Zoom, Google Meets, Whatsapp, and Slack.
-
Close all irrelevant Chrome tabs.
-
Stop all notifications on all your devices, and make sure there's nothing left to disturb your interview.
-
Make sure that you have at least 50GB of storage space available on your computer.
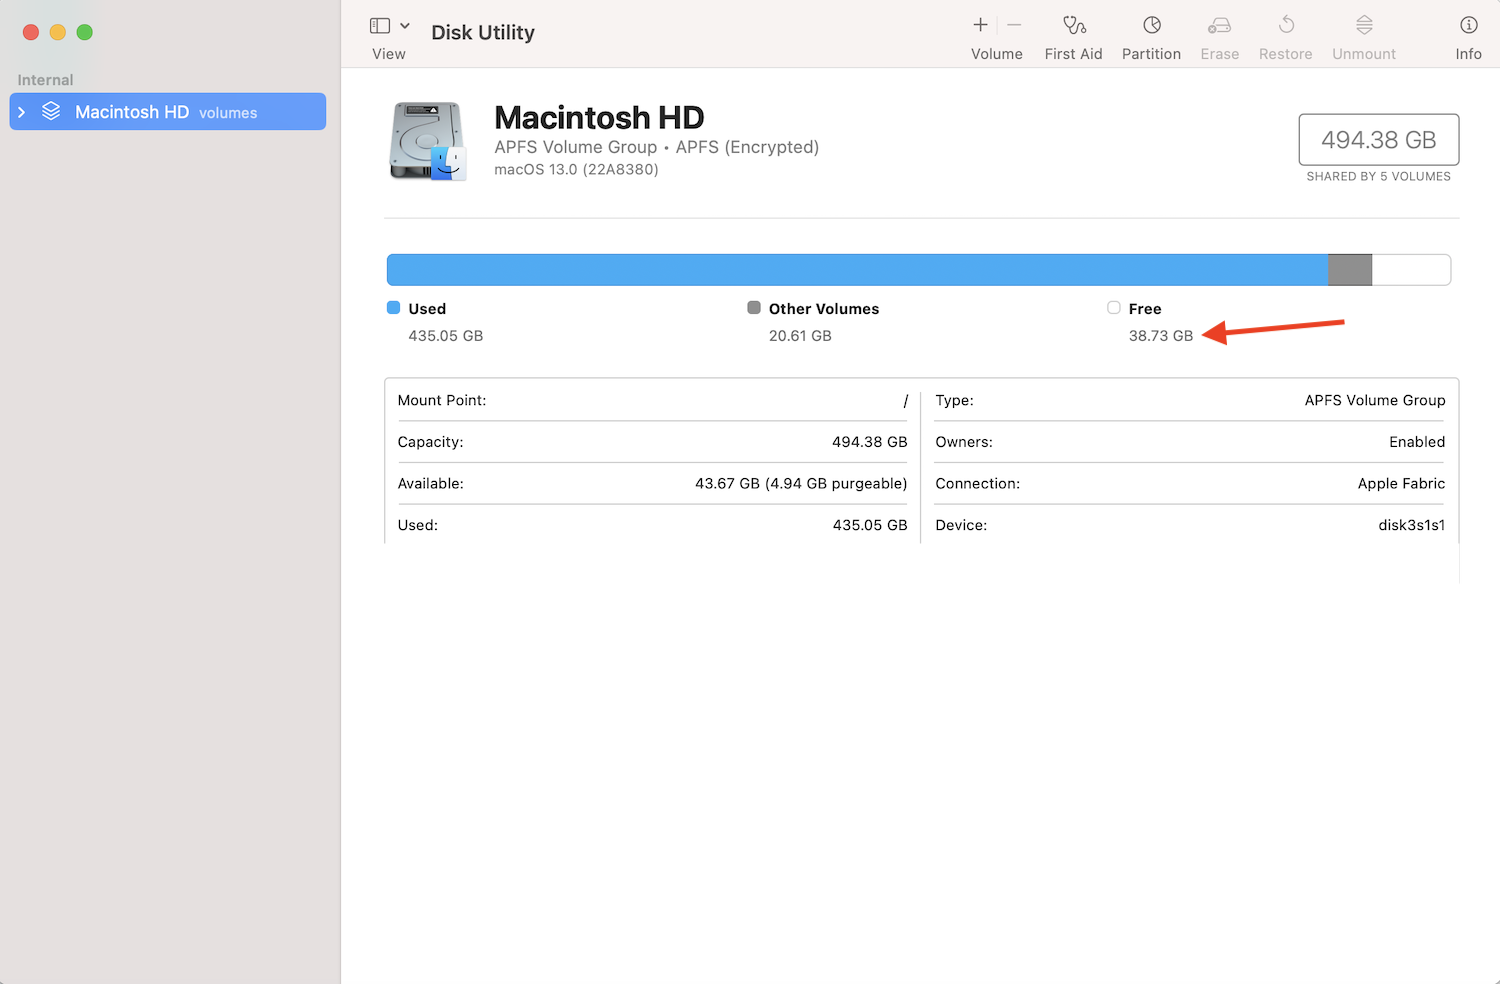
How To Check For Storage
1: Access Finder
2: Go To Utilities & Disk Utility
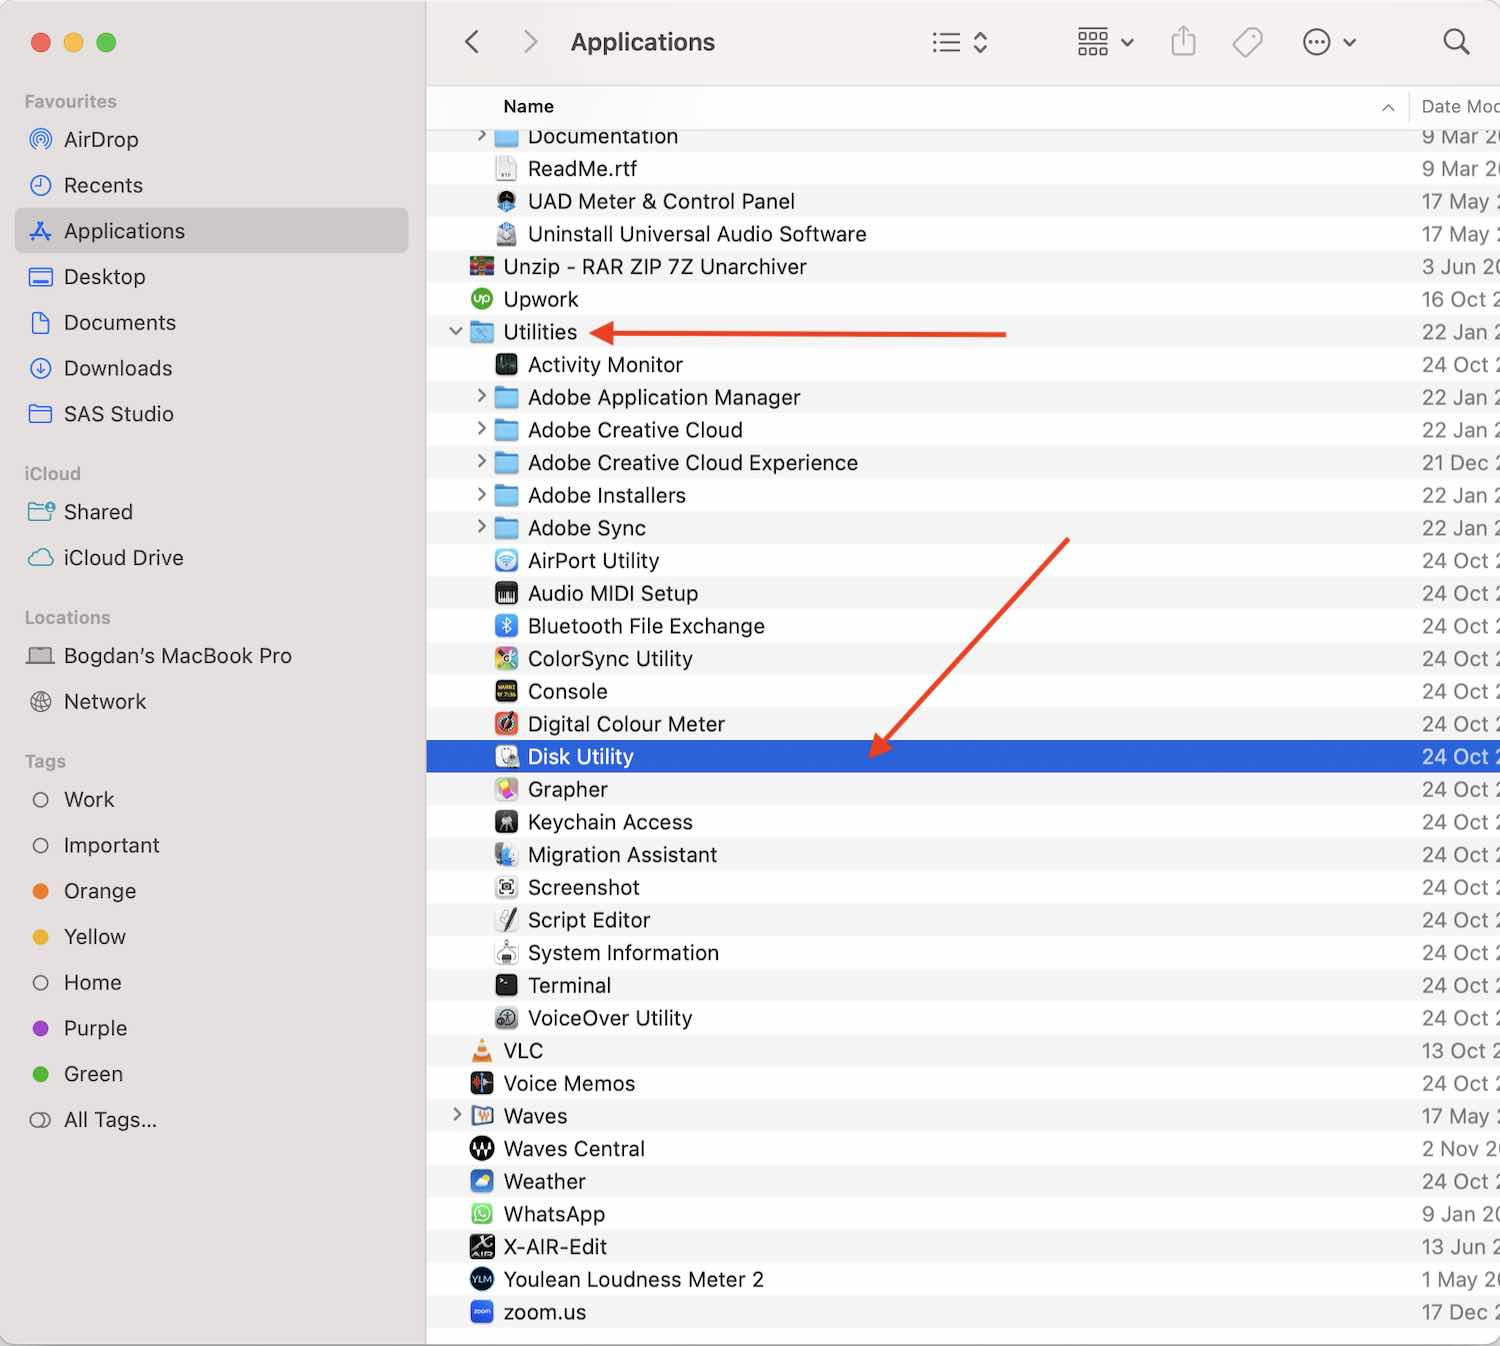
3: Check Disk Space (We have only 30GB left) 😱
Step 3: Connect Your Equipment
When you record using a laptop, make sure it is connected to an outlet. If you live in the UK, remember to turn on that switch. The last thing you want is your laptop to power off during recording.
If using a USB mic:
-
Plug your microphone into the USB port on your computer. Check that it is plugged all the way through. Do a “wiggle test” to make sure it is not easy to disconnect from the port. Sometimes, adding some tape as prevention could be a good idea, but not always. The tape can leave residue on your laptop, so keep that in mind.
-
Most importantly, make sure that you use high-quality cables.
-
Plug your headphones into the microphone. Some really cheap mics don't have this feature available, so plugging your headphones directly into your computer will do the job.
If using an Audio Interface:
-
If using an Audio Interface for recording audio, connect your Audio Interface to the USB port on your computer. Verify that it's plugged all the way through. Do a “wiggle test” to make sure that the audio interface is not easily disconnected from the port.
-
Two extra steps are required here. One is to plug your microphone into the sound card using an XLR cable. The other one is to turn on the 48v (phantom power) if your microphone requires that. (Most Condenser Microphones Require This)
-
Plug your headphones into the headphone port on your audio interface. Usually, the port is indicated with a headphone image or with a “headphone output” label.
Step 4: Make Sure The Equipment Is Correctly Identified By Your Computer
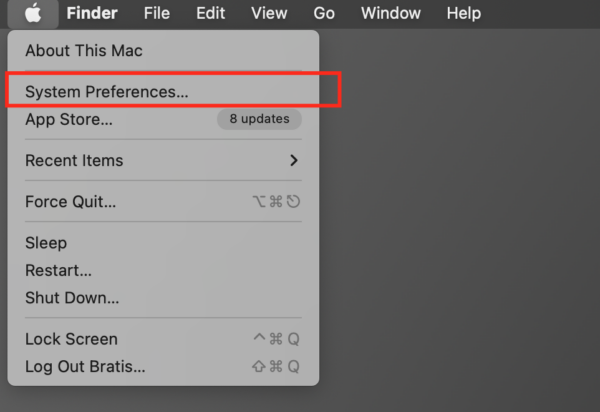
For MAC users:
1: From the Apple, menu choose “System Preferences” and then navigate to “Sound”.
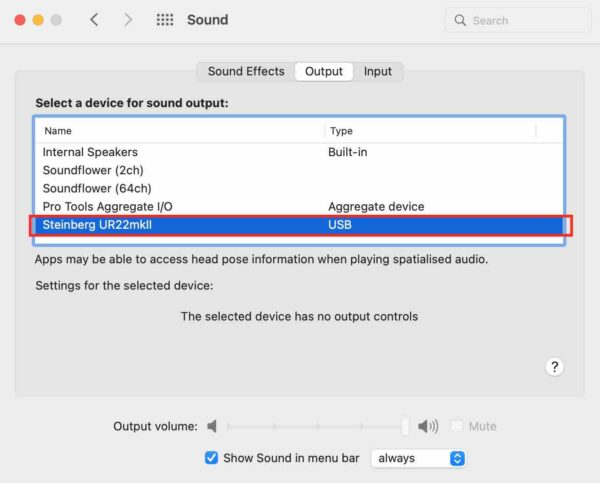
2: In the Output tab, select your USB Microphone or your Sound Card. As I said, some cheap microphones may not have a headphone output, so in this case, select the Built-in option. In our case, we selected “Steinberg UR22mkII”.
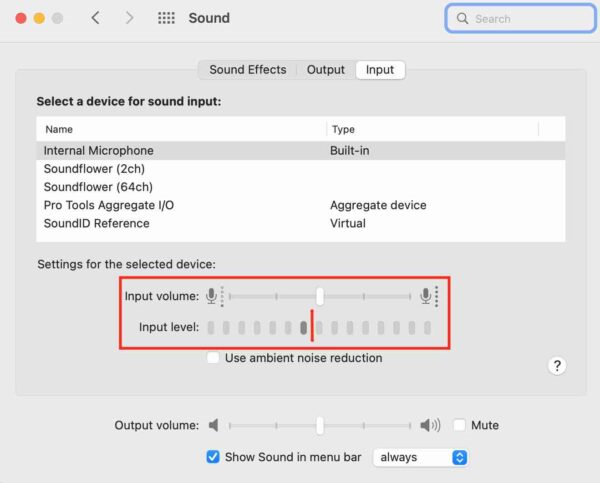
3: In the Input tab, select your USB Microphone or your audio interface. If nothing shows up in any of these tabs, it means your microphone/audio interface is not connected, or one of your elements is defective. Again, in our case, we selected “Steinberg UR22mkII“.

4: Check the Input level of your mic. In simple terms, this level is how loud your microphone captures the sound. The level set in this section doesn't need to be too low or too high. Our advice is to talk into the mic like you usually talk during an interview. If you usually laugh or shout or are a loud talker, talk in the same manner while you do this check. Generally, the input level should not go higher than 50% – 60%. This single step can massively affect the sound quality of your podcast.
If using a USB mic:
Some USB microphones have a “gain knob” on the microphone itself. Keep in mind it's “gain knob” NOT “volume knob”“playback knob”. That gain knob can be used to control the input level of your mic.
If using an Audio Interface
Some audio interfaces don't display the input volume slider from the image above. Instead, you can control the gain input level using the knob on your audio interface. The knob is usually labelled as “gain” or “input”.
! IMPORTANT: Make sure you talk into the front of the mic and not on the side of it. If you have any doubts, check our top 5 podcast mistakes to avoid.
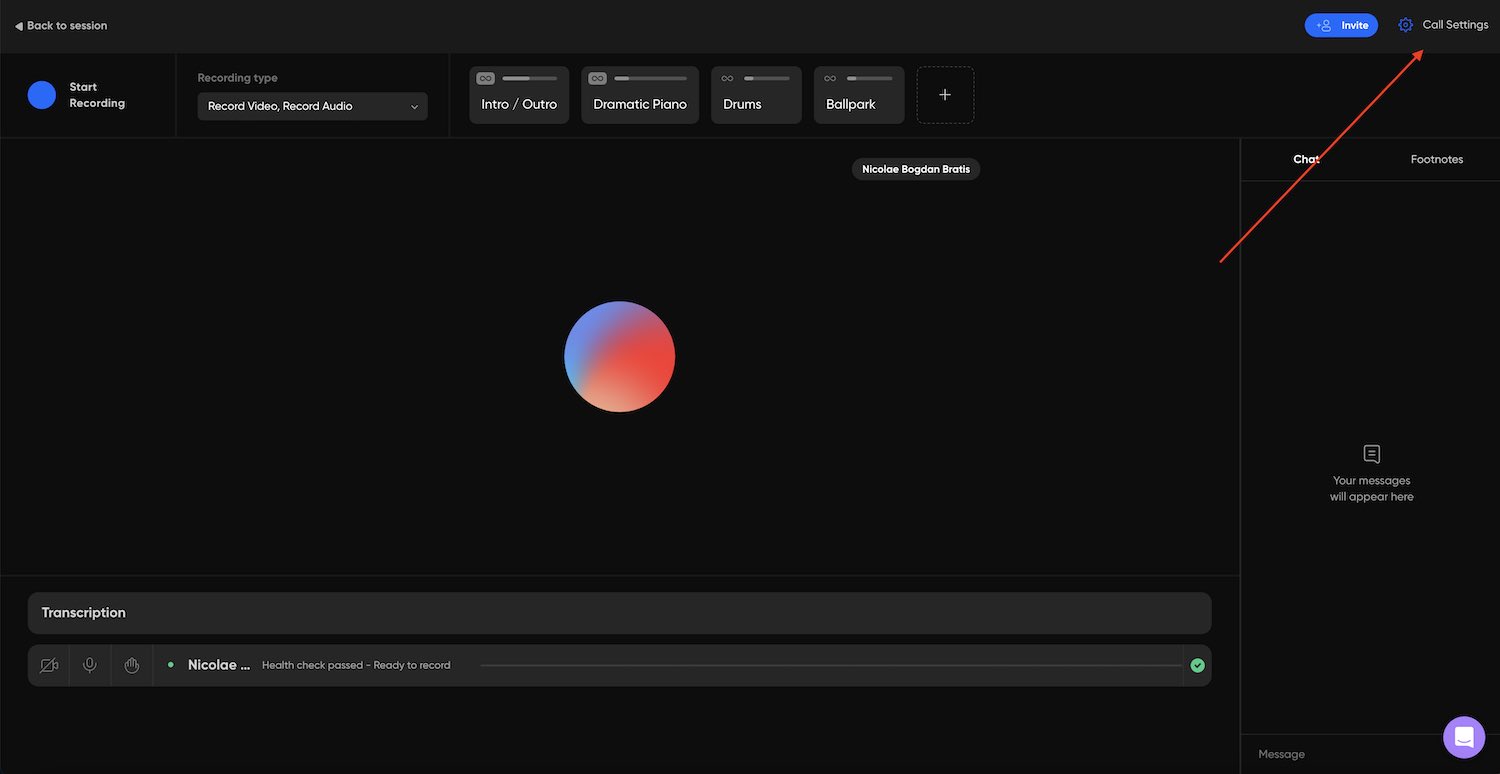
Step 5: Ensure That The Equipment Is Correctly Identified By Znecastr
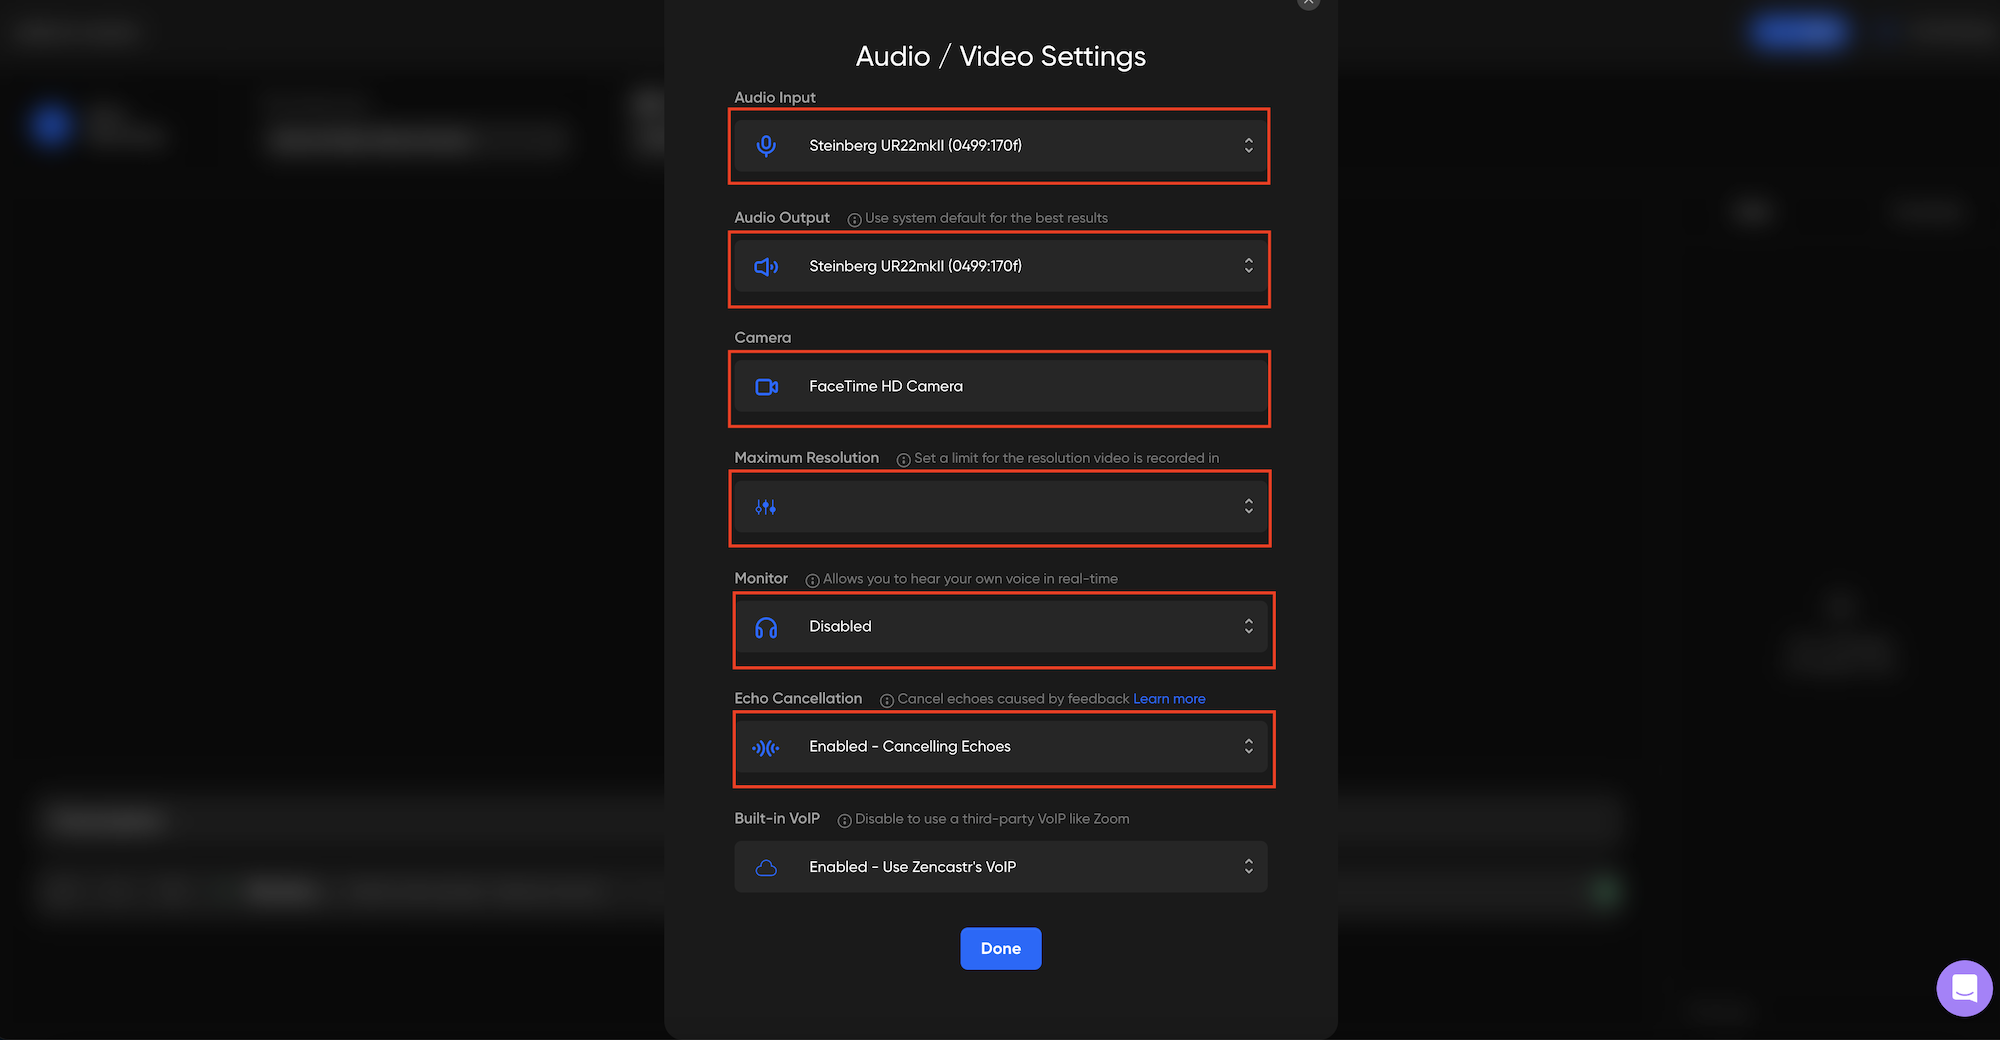
1: Check that the microphone is available to use in Zencastr. Sometimes browsers ask for permission in order to access the microphone or the webcam. If that's the case, hit accept and go forward with creating a new episode. You can verify if you are indeed recording using your microphone and not the built-in one (in Zancastr, go to “Settings” (located in the top-right corner), click on it, and you will be prompted with a pop-up window).
2: As you can see, in the Input and Output settings we have the same options selected as in the System Preferences / Sound. In the image below, Echo Cancellation is enabled. We strongly advise disabling this feature if both parties, the host and the guest, use headphones. (I'll come back to this in a bit)
3: Hit record and check the waveforms. As you can see in the image below, there are a few spikes in the recording. The one highlighted in red is exceptionally loud. When something is TOO loud, it creates something called “clipping”, which translates into distortion.
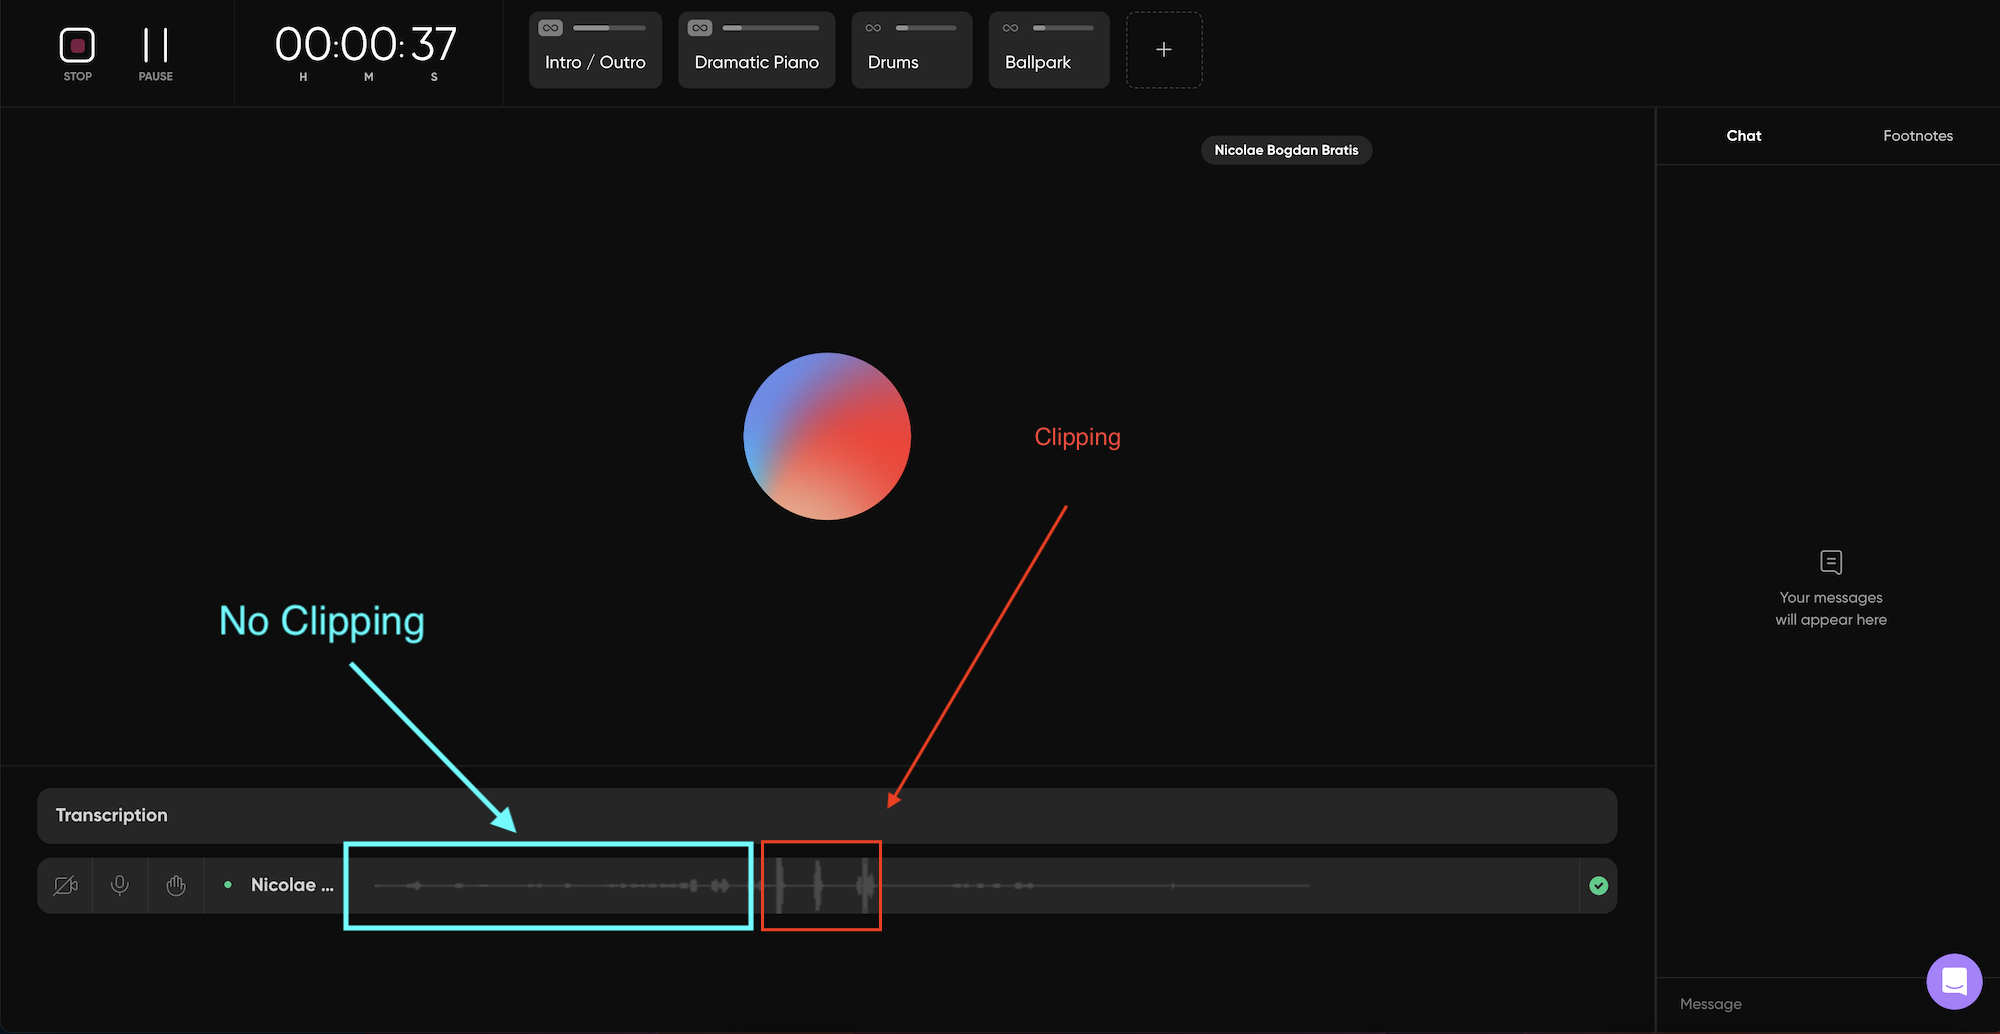
You want to avoid having your recording's volume too loud. It should look more like the one highlighted in blue. If you notice that the waveforms are large, lower the input gain on your mic. Double-check the steps above.
If the guest tells you that they can't hear you loud enough, advise them to increase the volume of their speakers instead. Try to avoid increasing the input gain of your mic.
Step 6: Echo Cancellation In Zencastr
Note: It is a Bit Complicated, But Read Carefully!
The echo cancellation is a neat feature, but in some cases, it can do more harm than good. We strongly advise that both parties, the guest and the host, wear headphones during the interview recording. The headphones will isolate the speakers of your laptop from the microphone.
Let me explain:
For example, if the guest does not wear headphones, the following phenomenon will happen:
-
You will tell the guest, “Hey, how are you?”.
-
That would be played on the guest's side through his laptop speakers.
-
What comes from the speakers will be captured by the guest's microphone.
-
(And then) in your headphones, you will hear yourself a bit delayed saying “Hey, how are you?”
That is how sound travels. In order to stop this loop, the guest would need to use a pair of headphones so that “Hey, how are you?” does not get captured by the mic.
The echo cancellation from Zencastr is able to stop this phenomenon by automatically muting/gating the guest's mic, so when the host talks, the guest's mic is not able to capture the host's voice through his/her speakers.
The issue appears once the host starts talking over the guest. When you talk over the guest, the echo cancellation feature will try to mute/gate the guest's mic while he/she is talking, which will affect the audio quality of your recording.
Step 7: Welcome Your Guest To The Recording Room
Send a link to your guest via e-mail or another form of communication. To send a link, follow these instructions.
It is time to hit record!
Well, not so fast…Before you start recording, there's one more thing to check. Your guest's settings.
Usually, guests are not very technical, and it can be hard for them to understand how Zencastr works, not to mention that a bad connection can make it hard to communicate with them. Telling your guest what to do is ultimately your decision, but I have to mention that while you give the guest exposure, and if he/she comes unprepared for the recording, that shows a lack of respect and professionalism.
So, to avoid any bad situations, create a list of things the guest should prepare before the day of recording. Things such as checking your internet connection, bringing a pair of headphones, and recording in a relatively quiet environment. These aren't unreasonable demands! At the end of the day, a bad-sounding podcast can really drive your listeners away, and it won't do you or your guest any good.
I prepared a free guest checklist template to send to your guests. Use it! Download it and customize it to fit your needs, and it will make podcasting a lot easier.
Download Checklist
Step 8: Stop Recording
Once you are happy with the interview, stop recording. Keep your guest in the recording room for a few more minutes until all individual files are uploaded to the server. If the guest decides to leave Zencastr, the files will fail to upload, and you will need to ask your guest to come back in the same room and restart the uploading process, which can be frustrating.
What if the audio and video didn't finish uploading?
If the guest left the session early, you will need to try to retrieve the files using several methods. Zencastr has an entire guide on how this needs to be done.
In a nutshell, the guest will need to join the same recording session and click on the "retry upload button" on the track that didn't finish uploading. After that, you will be able to click on the download button to retrieve the files.
Should I use Zencastr to post-produce my podcast?
The short answer is no. Zencastr is a great recording platform; however, when it comes to post-production, it lacks essential functionalities found even in free editing software such as Audacity.
On top of that, Zencastr works with what they call "post-production credits" and editing your podcast this way can become expensive.
Smart Filters
The feature "Smart filters" was introduced back in 2021, and it allows podcasters to automatically remove long pauses in recording. In my opinion, "smart filters" is just another shiny feature that won't provide you much value, especially if you use dedicated post-production software for editing your podcast.
Can I Use a Mobile Phone While Recording with Zencastr?
The answer is yes! With the release of Zencastr Mobile, it is now possible to record a podcast using your iPhone or Android phone.
Conclusion Zencastr
Generally, the guest would need to do a similar check of what you performed following this guide. With certain guests, this can be almost impossible to achieve. So, do your best! If you feel your guest is responsive and can follow guidance, then go ahead and guide him. Check his microphone (if one is available); make sure the input level isn't too high and so on.
If your recording didn't go as planned or you just want it to sound its best, use our podcast editing services.
I hope you find this Zencastr guide useful, and if you have any questions, don't hesitate to get in touch!
Comments
No comments yet!